
WordPress SEO Guide
0 6675
There are many interesting features available in WordPress, you need to install plugins to utilize all features on WordPress since there are various plugins available in WordPress including SEO plugins like SEMrush (7 Days Free Trial), Google Keyword Planner, SEOPressor Connect, OutreachPlus, SEOquake, Yoast SEO, etc. among them Yoast plugin is a very popular feature used by current users.
Now the question is what is Yoast plugin?
What are the benefits of this Yoast plugin and why this plugin is more famous nowadays?
 Yoast is a very powerful freely available tool for improved search engine results as it optimizes the various posts and pages by integrating keywords and automatically updating of XML sitemaps and cleanup permalinks and assists to improve rankings and gaining the attention of subscribers.
Plays an important role to raise readers involvement and visitor's attention through social sites and from Bing and Google. Yoast facilitates a Meta box to set templates and optimization of a different title, description, post title, and meta description for the different types of pages.
Steps to install and activate the Yoast SEO plugin
Yoast is a very powerful freely available tool for improved search engine results as it optimizes the various posts and pages by integrating keywords and automatically updating of XML sitemaps and cleanup permalinks and assists to improve rankings and gaining the attention of subscribers.
Plays an important role to raise readers involvement and visitor's attention through social sites and from Bing and Google. Yoast facilitates a Meta box to set templates and optimization of a different title, description, post title, and meta description for the different types of pages.
Steps to install and activate the Yoast SEO plugin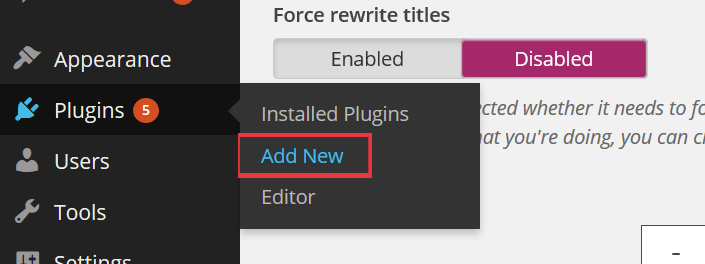
b) Go to tools and SEO data; you can import data by filling the source and destination platform name.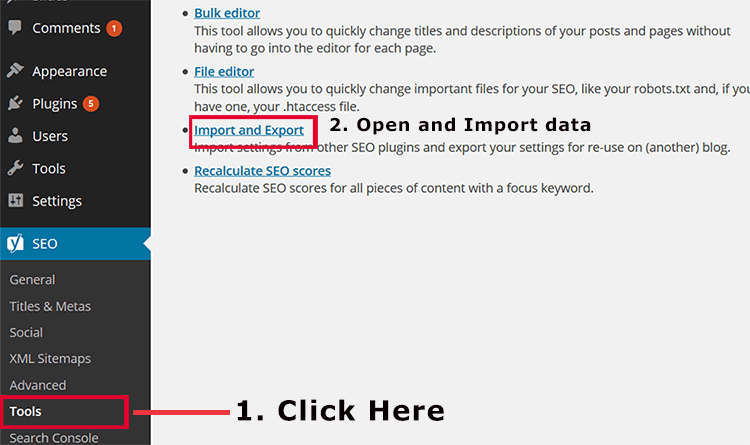

General: Here you can select the required symbol to separate two titles. And the Default symbol available is a dash. On the displaying page, you can also enable and disable and keyword analysis and readability tab which present under the Yoast SEO meta box while writing a post. Homepage Title: The next step is to define the title of the Homepage. It contains Title Template and Meta description Template acts as the most important functions in the Yoast plugin. By default, these fields are pre-filled need to modify according to requirement. Add a title and Mega description and after adding do not forget to save changes. Yoast plugin has the capability to integrate title and description templates automatically at the homepage and another page.
Post Types Titles & Metas: There are various posts available in WordPress by default for e.g. attachment, navigation menus, and post revision. Yoast SEO allows you to easily define post custom types and to set specific title and meta for different media, pages, and posts. These provide the reference when we forgot the specific title name and description. Taxonomies: Taxonomies word can be referred to as Hierarchy or grouping. These features of WordPress are the best method to combine custom post types and post. Tags and Categories are the two taxonomies available in WordPress. They are used to allot categories and subcategories to your post, custom configuration, and post format archives. You can give the topic name and then group into subcategories for example if you have a custom post type called a car. You can make a new custom taxonomy known as Topics. And make categories like Alto Car and Swift. Archives: In the Archives Tab, you can enable and disable the author and date archive pages. Other: In the other Tab, you can modify the other required additional settings.
Facebook: To configure Facebook setting go to facebook tag and it will display the page with settings, from where you can able to enable or disable the open graph metadata and front-page settings where you can set the title, description, images that you want to share. Twitter: On Twitter Tag, you can configure the Twitter settings. Switch to twitter tag it will display the page from where you can pick up the cards that needed to be integrated.
Now switch to User sitemap and enable it and save changes and the same process should be repeated for taxonomies and post types. With the excluded post, you can easily remove the irrelevant posts or pages from XML sitemap by writing the post IDs in the blank field and after entering don't forget to save changes.
Settings
Yoast is a very powerful freely available tool for improved search engine results as it optimizes the various posts and pages by integrating keywords and automatically updating of XML sitemaps and cleanup permalinks and assists to improve rankings and gaining the attention of subscribers.
Plays an important role to raise readers involvement and visitor's attention through social sites and from Bing and Google. Yoast facilitates a Meta box to set templates and optimization of a different title, description, post title, and meta description for the different types of pages.
Steps to install and activate the Yoast SEO plugin- Click on add new from plugin area
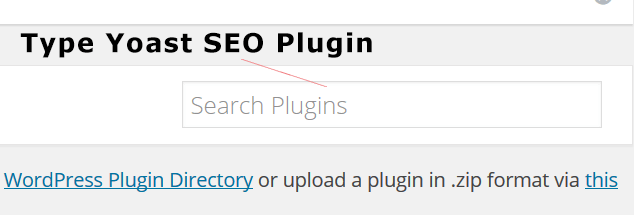
- Search for Yoast SEO plugin
- Click on SEO plugin and install now
- Once installed Go ahead and activate it
How to set up Yoast SEO Plugin
STEP 1: Transferring Data from the previous plugin to the new plugin
a) If you have already set up a previous SEO plugin and wants to transfer its data into yeast SEO plugin, you can do this with SEO data transporter by following the same installation steps as in Yoast SEO pluginb) Go to tools and SEO data; you can import data by filling the source and destination platform name.
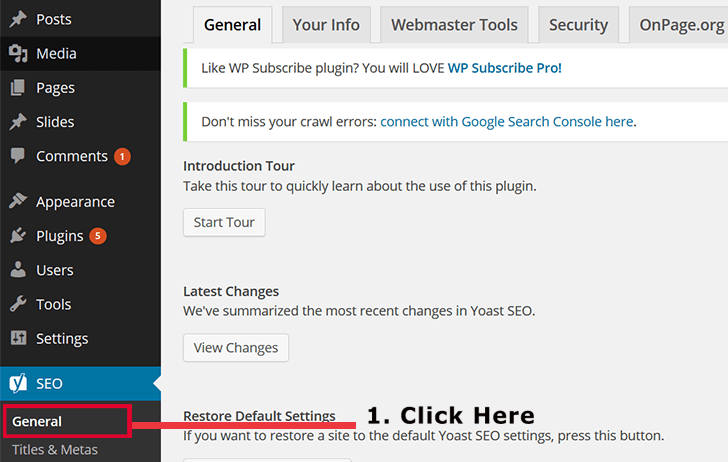
STEP 2: Perform the General Settings
Select and click on 'General' tab there you will observe a button with configuration wizard to begin the configuration process.STEP 3: Features Settings
Go to SEO icon, open dashboard, visualize, and click on feature area. It displays features like readabilities analysis, Keyboard Analysis, Advance setting pages, onpage.org. Determine they are enabled. If disabled, enable it and then save the changes.STEP 4: Info Settings
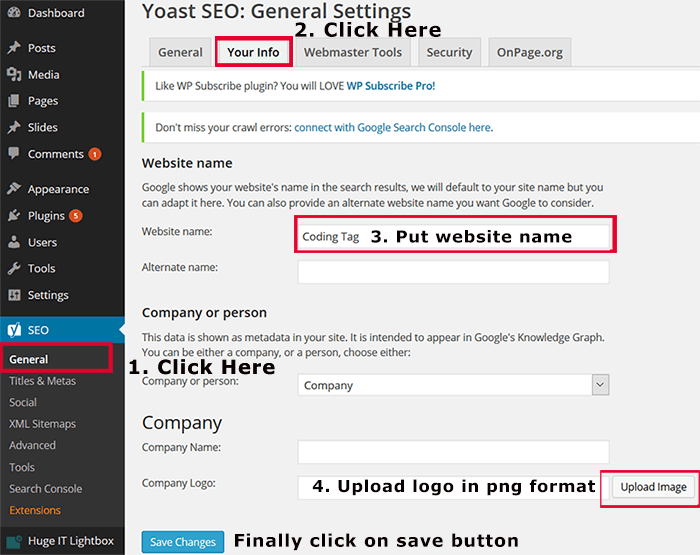
Next, you are required to go to the "Your Info" tab. Go to info, fill the website name and your company logo and then save changes.STEP 5: Webmaster Tools
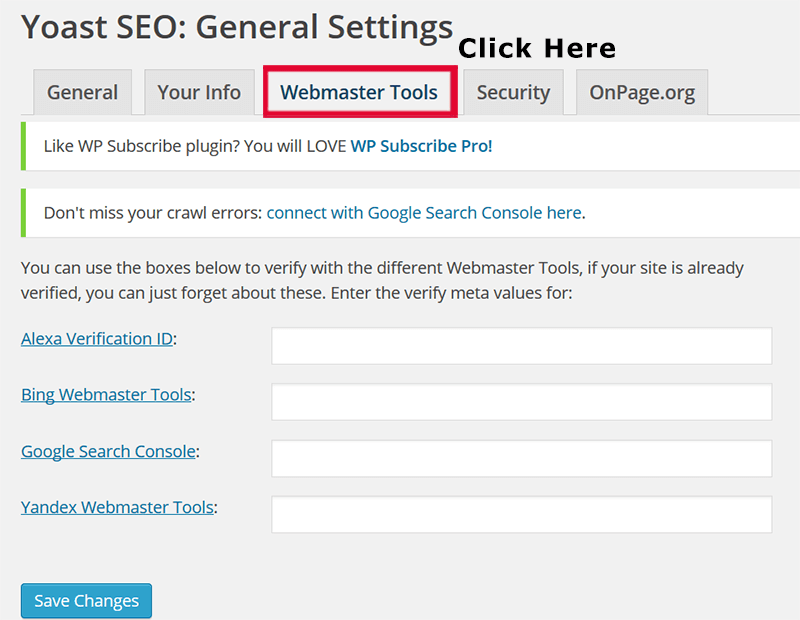
If you are familiar about SEO, then you have definitely heard about common search engines like Google, Yandex, and Bing allowing site owners to integrate their sites through webmaster tools to identify the relevant information about their websites from particular search engines by simply adding the meta tag and uploading a file of their website. With the webmaster section, you can easily track search engine performanceSTEP 6: Security Settings
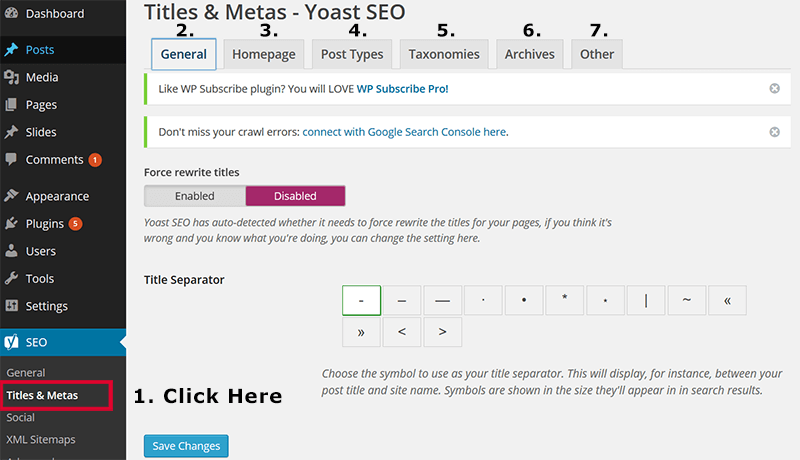
Switch to Security Tab, you will notice Security Settings to enable or disable the advanced section of the Yeast Meta Box. After enabling, don't forget to save changesSTEP 7: Titles & Metas
Yoast SEO Titles & Metas have certain tabs in it. Like General, Homepage Title, Post Types Titles & Metas, Taxonomies, Archives and othersGeneral: Here you can select the required symbol to separate two titles. And the Default symbol available is a dash. On the displaying page, you can also enable and disable and keyword analysis and readability tab which present under the Yoast SEO meta box while writing a post. Homepage Title: The next step is to define the title of the Homepage. It contains Title Template and Meta description Template acts as the most important functions in the Yoast plugin. By default, these fields are pre-filled need to modify according to requirement. Add a title and Mega description and after adding do not forget to save changes. Yoast plugin has the capability to integrate title and description templates automatically at the homepage and another page.
Post Types Titles & Metas: There are various posts available in WordPress by default for e.g. attachment, navigation menus, and post revision. Yoast SEO allows you to easily define post custom types and to set specific title and meta for different media, pages, and posts. These provide the reference when we forgot the specific title name and description. Taxonomies: Taxonomies word can be referred to as Hierarchy or grouping. These features of WordPress are the best method to combine custom post types and post. Tags and Categories are the two taxonomies available in WordPress. They are used to allot categories and subcategories to your post, custom configuration, and post format archives. You can give the topic name and then group into subcategories for example if you have a custom post type called a car. You can make a new custom taxonomy known as Topics. And make categories like Alto Car and Swift. Archives: In the Archives Tab, you can enable and disable the author and date archive pages. Other: In the other Tab, you can modify the other required additional settings.
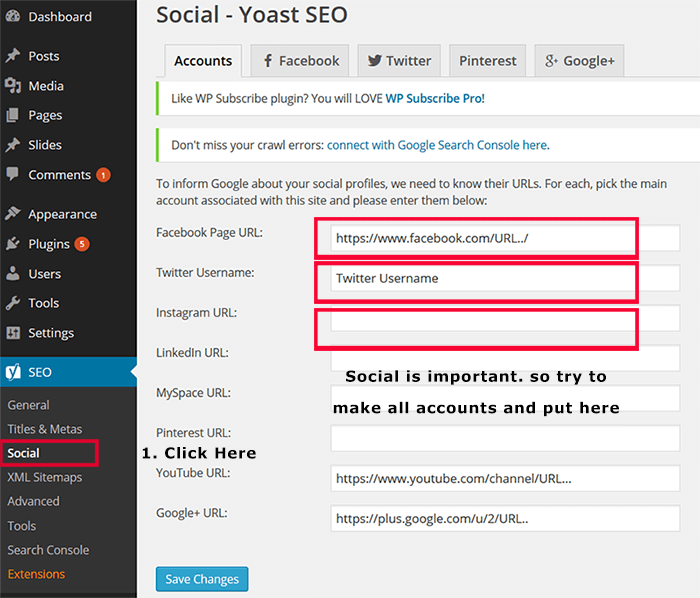
STEP 8: Social Feature
This is the most active feature used nowadays for optimization by integrating the blog with social networking sites like Twitter, Facebook, LinkedIn, and many more. Under Social Tab, go to accounts. From accounts, you can easily paste the URL associated with your site to let search engines aware of your site.Facebook: To configure Facebook setting go to facebook tag and it will display the page with settings, from where you can able to enable or disable the open graph metadata and front-page settings where you can set the title, description, images that you want to share. Twitter: On Twitter Tag, you can configure the Twitter settings. Switch to twitter tag it will display the page from where you can pick up the cards that needed to be integrated.
Step 9: XML Sitemaps in Yoast plugin
XML Sitemaps are the most simpler and common method for indexing and navigation of WebPages, it allows the hierarchal arranging of WebPages by classifying website content for amazing visibility. Steps to configure XML sitemap settings in Yoast plugin Switch to XML sitemap under the social Tab where you can enable and disable the XML sitemap Functionality. Enable it. The XML Sitemaps settings also contain subcategory of settings such as user sitemaps, taxonomies, post types, and excluded posts.Now switch to User sitemap and enable it and save changes and the same process should be repeated for taxonomies and post types. With the excluded post, you can easily remove the irrelevant posts or pages from XML sitemap by writing the post IDs in the blank field and after entering don't forget to save changes.
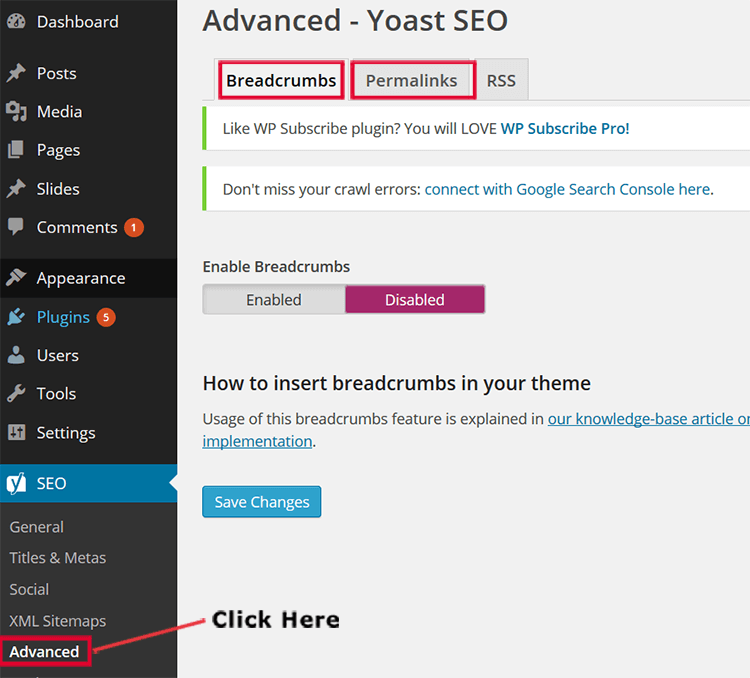
Step10: Advanced Settings
An advanced tab under XML Sitemaps provide, permalinks, breadcrumbs, and RSS dependent configurationSettings
Breadcrumbs
Go to breadcrumbs to enable breadcrumbs. Now the question is what are breadcrumbs? Breadcrumbs serve as an important aspect also known as the navigation links on our websites used for internal linking. After enabling the breadcrumbs setting go to appearance and click on the editor. On the right side template section, open the header.php file. You have to add one script to the editor and update it. If there is an error in breadcrumbs, Go to the Pages tab and click on all pages and then click on the edit page. Notice on the right side under page attributes, set the parent value to the home and update the file and then refresh it and verify the home blog page.
Share:


Comments
Waiting for your comments