
How to give Admin Rights to Others
by Devender
0 3167
Over time Facebook has become one of the most important marketing tools for every brand and business. Every major brand or business has a Facebook page for itself. In today’s digital world, it is a necessity to have a Facebook page if you have a business.
The real problem arises when you have a page and don’t have time to handle it because it is not a one-person job. The best solution would be giving admin rights to others too. So, if you also have a page on Facebook and looking to provide admin rights to someone, then, we are here to help you. Today, we will show you how you can give page roles to other people.
A page’s admin has the most rights, he can choose which role to assign to others. If you choose to give admin rights to other people, then they will also have the same authority and rights to that page as you. In case, if you don’t want to give equal rights as yours to anyone else, then, you can simply add them as moderator, editor, etc.
Now, just tag along and understand how to add others as an editor, admin, etc. to your page.
How to give Admin rights to others?
It is quite an easy process and can be done from any device within a matter of minutes.
1 Open your page.
The first step will be to open your Facebook page.
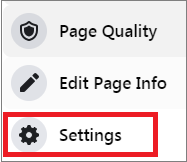
2 Go to the "Settings" option.
On the left side of your screen, you will find many options related to your page. Scroll down to the bottom where you will find the "Settings" option.
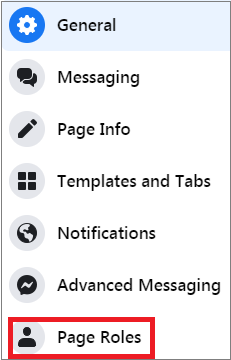
3 Choose the "Page roles" option.
In the settings options, you will come across the option of "Page Roles". Select this option to add an admin to your page.
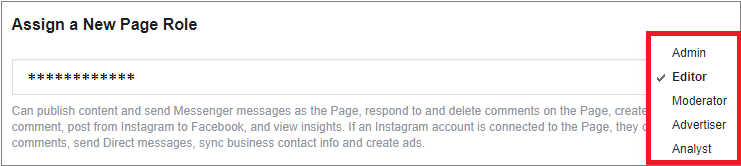
4 Add the name/email address of the person.
Now, you will come across the "Assign a New Page Role" section. Add the name or emailing address of the person you want to add as an admin.

5 Select a role and click "Add".
Now, you have to choose a role for this person. Click on the drop-down list and choose a role. There are 5 different options available.
After selecting a role for the person, you just need to click the "Add" button.

6 Enter your password.
Facebook will ask you to re-enter your password in order to confirm your request. Enter your password and move forward.
Your work is done now. All you have to do now is wait for that person to accept your invite for that post. When and if that person accepts your invite, they will get that role on your page. You can also change the role of any person later by just clicking the "Edit" link next to the person’s name and selecting the new role.
Now, you have learned the process of giving someone a role on your Facebook page. If you like this information, please share it and don’t forget to subscribe to our free newsletter.

Share:
You May Also Like


Discount Coupons


Expand Your Business Reach


Comments
Waiting for your comments