
How to show Offline in Facebook
by Devender
0 3290
Facebook was created by Mark Zuckerberg and his colleagues for one simple motive that is to let people interact. But now, Facebook serves a lot of purposes than just a place for interacting. So, it provides a lot of options to its users and one such is showing you offline while using Facebook.
Sometimes, a user just wants to scroll through Facebook news feed for passing time and suddenly a message pops up. Well, ignoring a message is always considered rude. So, one must reply and then the conversation has no ends.
Many times people whom you are ignoring like your long distant relatives or annoying friends see you online and message you. It becomes a burden to reply to them. So, what should you do? Well, the simplest solution would be turning your online status Offline because removing those people might turn into chaos later.
Now you must be wondering how you could be online and still show Offline to your contacts. It is possible and quite easy. We are here to help you get rid of these unwanted people. However, showing offline doesn’t mean you will not receive messages anymore. It’s just that you can reply to them later and continue doing whatever you like. They won’t be expecting you to reply as you will be offline to them.
So, let’s see how to do this simple and effective deed.
How to show offline on Facebook?
It can be done by using any platform: your phone or your desktop. However, the process is a little different for both. So, we will be discussing both one by one.
Showing Offline from your phone:
1 Open your Facebook account.
Launch your Facebook application and log in to your account.
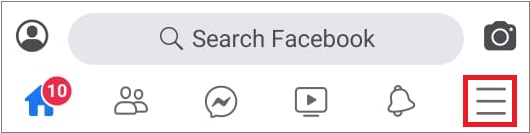
2 Click on the menu bar icon.
In the top right corner of your screen, you will be able to find the "≡" icon. Click on it to open the menu bar.
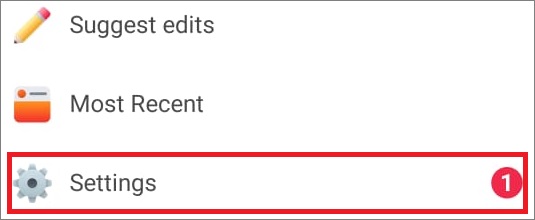
3 Choose settings.
In the menu bar, scroll down until you reach the "Settings" option. Select it to open the settings.
4 Select the "Active status" option.
In the settings option, scroll down to the privacy section where you will find the "Active status" option.

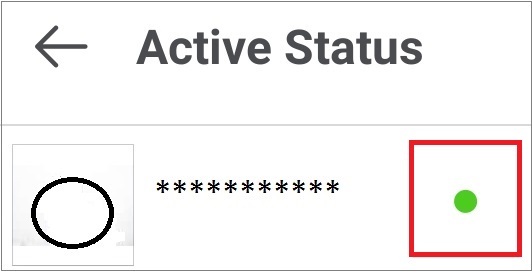
5 Click on the "Active" mark.
When you click on the "Active status" option, your name and profile picture with the active sign will be in front of you. Click on the green/active sign.
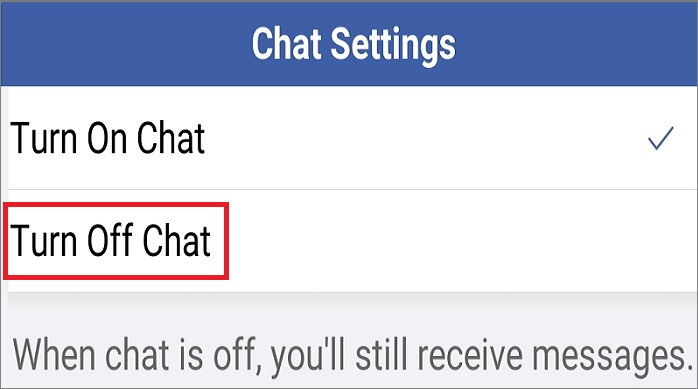
6 Choose the "Turn off Chat" option.
A new pop-up window will open, in this window choose to turn off chat and you will be shown offline to all your friends.
In these easy 6 steps, you will be able to set yourself as Offline. If you use Facebook from a computer or laptop, then, follow the steps in the below guide.
Showing offline from Laptop/Desktop:
Showing yourself offline is very easy from your computer or laptop when compared to doing it over the phone. In just 4 simple steps, you will be able to do it. So, without wasting any more seconds, let’s move to the steps.
1 Sign in to your account.
The first step will be to open any browser, visit Facebook.com and sign in to your Facebook account.
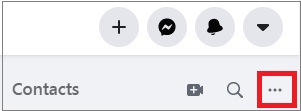
2 Click the "Gear" icon.
Over the Chat option, you will find the "…" icon known as the gear icon. Click on it to open the chat menu bar.
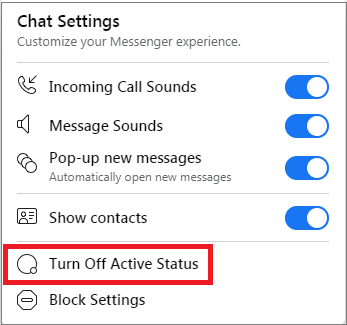
3 Go to the "Turn off Active status" option.
In the menu bar, you will find the option of "Turn off Active status" option at the bottom.
4 Select one option and click "okay".
Facebook will provide you with 3 different options.
- The first one will be to turn off active status for all your contacts.
- The second one will allow you to choose your favorite people. Only the selected people will be able to see you online. You will be offline to all the rest.
- The third one will allow you to turn off active status to selected people. You will be offline to the selected people only and the rest of all your friends will see you online.
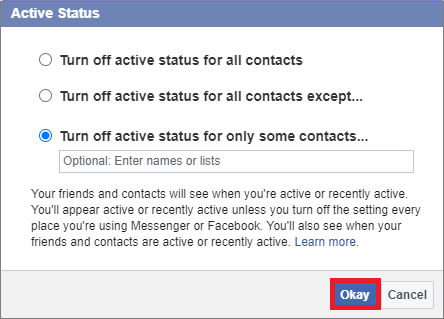
After choosing one of the 3 options, you just need to click the "Okay" button and you will be offline.
If you are still with us, then, you have learned the process of being online and showing yourself offline. If you like this information, please share it and subscribe to our free newsletter.

Share:
You May Also Like


Discount Coupons


Expand Your Business Reach


Comments
Waiting for your comments